1981 Suzuki RM250 Restoration
- japanmotonuts
- Jan 2, 2023
- 3 min read
Updated: Jan 6, 2023
This post is the first of a series showing my restoration of vintage bikes. I like to work mostly on Motocross bikes because for me they represent the best engineering of an era, look agressive and beautiful, and of course are fun to ride.
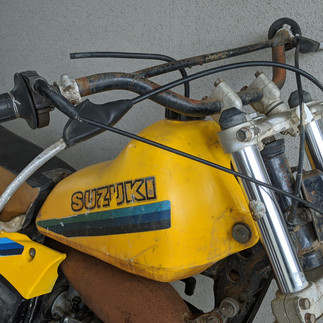
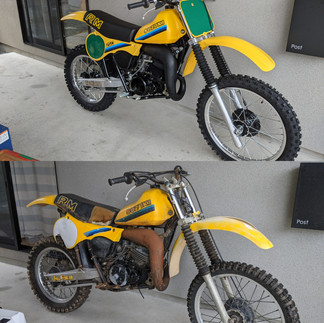
Suzuki RM 250cc from 1981; the last air-cooled 250cc engine but with the introduction of the " full floater" the best suspension of that time. 1980 model had twin shocks and from 1982 the engine became water cooled, so many parts are unique to this model. I bought the bike in Akita (Northern prefecture of Japan) for 44,000 Yen (around 400US$) in very bad condition.
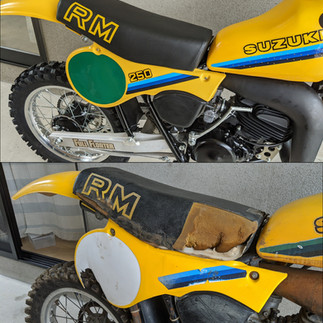
I'll try to explain a bit how I went from that:


To that after roughly a year of restoration:

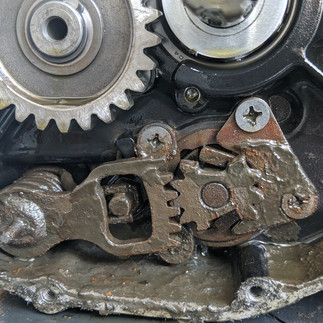
First assess the damages! Almost everything is rusted and the oil in the gearbox transformed into mud. Luckily the piston engine was not blocked, I changed oil, cleaned the carb and could start the engine. Gears did not pass; the clutch did not engage.
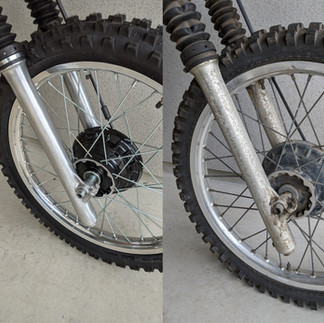
One good point was that the chrome of the fork tubes and rear shock wasn't pitted by rust.


Restoration begins, first strip all paint and remove rust form the frame. I used chemical paint scrapping and hand sanding, this is a lot of work so next time I will bring the frame to a sand blasting company.
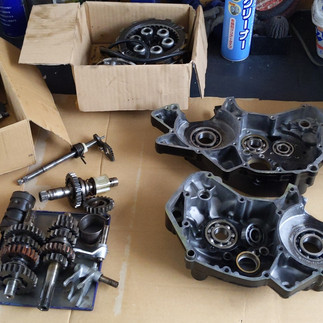
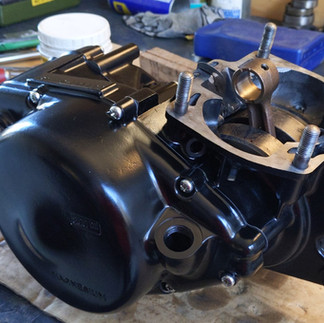
I sand blasted the engine cases, wheel hubs, and smaller parts before painting. I learned in the process that it is better not to sand blast the crankcase, it is almost impossible to avoid sand remaining in the gearbox!
I used Urethane paint, glossy black for the frame and semi-gloss for the rest.


Then I inspected the gearing, no tooth broken. This is lucky since it is almost impossible to find replacement. I changed all seals and bearings.
I found two problems:
- The crank bearings had play. Insert on both sides were broken. This is a known problem for Suzuki at that time. There are two solutions, find a new crankcase or machine new stronger inserts. I found a new crankcase in England for top price, the inserts are much stronger than the original. Probably an OEM replacement made to fix the problem. Finally, I did not use the new crankcase (I have it if someone wants it); my local machine shop Inoue boring in Kawagoe made stronger inserts for a much cheaper price (go check their page to discover Japanese machine shop).
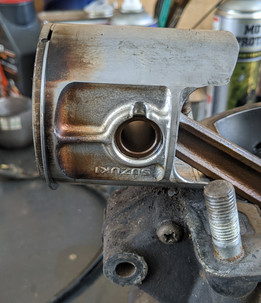
- The cylinder had a few scratches and the piston needed to be changed. Vintco is a savior with one step oversize piston and again Inoue boring for the reboring.


Plastics and seat foam and cover came from DC plastics. Decals, and all cables from Vintage Suzuki.
Restoring the tank took a lot of energy, buffing from 320 grit to 1500 and then dry wool buffing.
An interesting detail is the stamping on the tank. 56 is the 56th year of the Showa emperor, this is 1981.


The wheels are a lot of work. If the rims are not cracked or bent, I like to keep them since they are part of the original bike (one can see the reference 12 80 stamped, probably meaning December 1980). To get an acceptable aspect most of the scars and pit marks need to be buffed; that removes the grey anodisation of the surface and gives a shiny aspect. For protection I use a clear varnish from Cerakote (ref MC-156); very easy to apply even with a brush and dries overnight at ambient temperature.


Closing the engine and put it back in the frame, the best moment.


And let's get dirty!


Thanks for reading, I hope you liked this short article. Please send me a mail for or write a comment for any question or remark.


Comments